Code Injection
Code Injection allows you to insert custom code, such as <script> tags or additional HTML, into all or part of a Sandvox site. For example, you might use it to add PHP directives to your site.
The ability to use inject additional code is an advanced ability of Sandvox. If you want to add code, we assume that you already have a working knowledge of site coding (HTML, CSS, PHP or JavaScript) or wish to obtain one; this page is by no means intended as a tutorial, nor can Karelia provide specific troubleshooting advice related to an individual user's code.
If you want to learn more before attempting to inject code in your Sandvox site, we encourage you to visit the following third party sites that specifically address these topics:
- The HTML Code Tutorial
- EchoEcho.com HTML Tutorial
- The Webmonkey HTML Cheatsheet
- CSS Tutorial
- PHP Official Site
- JavaScript Tutorial
You can also check the Raw HTML, PHP, and JavaScript help articles for additional information.
You can insert code once but have that code appear on every page of your site, or you can insert code on a selected page or pages, so that only the pages you have selected are affected.
Inserting code on every page
To insert code on every page of a site:
- From the Edit menu, choose "Site Code Injection".
- Enter your code into the window.
Inserting code on selected pages
You can also apply Code Injection to a single page or a subset of pages.
To use Code Injection on a single page or group of pages:
- Select the page or pages to which you wish to apply code in the Site Navigator.
- Open the Edit menu, Choose "Page Code Injection…"
Any code entered will only affect the page you selected in the Site Navigator (and any children it may have) rather than the entire site.
Where code can be injected
Code can be injected in several places; your options are grouped into three tabs on the Code Injection screen.
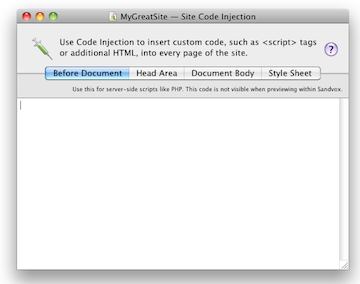
Before Document
Use this field to insert code at the very beginning of the document, before the opening <html> tag.
Do not insert HTML or Javascript code here; this location is only for server-side scripts (such as PHP code) to affect the headers, set cookies, etc.
Head area
When you select the "Head area" tab, you will see two input fields. The first is for those circumstances when you want to insert code early in the header (after the first <meta> tag); the second is the one that you would ordinarily use, to insert code later in the header.
Note that the head area is not for any visible content in your page. This is only for information about the page. If you want to put content into your page, it should go into a Raw HTML object or perhaps via code injection into the "Document Body" area.
Examples of HTML tags that are appropriate for the head area:
- meta
- style
- script
- link
Document body
When you select the "Document body" tab, you will see three input fields.
- Body (HTML tag)
- Use this field to insert code directly (for example JavaScript 'onload') inside the <body> tag itself.
- Body start
- Use this field to insert code after the <body> tag. This is generally used by JavaScripts that prepare for the rest of the page contents. (However, it's really a better idea to put your scripts at the "body end" section.)
- Body end
- Use this field to insert code at the end of the page, right before the </body> tag. This is generally the best place to place JavaScript code that processes the preceding page contents. If you put scripts here, they can be jQuery-based scripts, since the jQuery library code is loaded just before this section.
Style Sheet
Enter custom CSS here to adjust or add to your chosen design.
Only available for Site Code Injection. To insert styles for an individual page, put the CSS code between inside a <style> tag in the lower half of the Head Area.
Keywords: code, inject, injection, injects, injections, injected, injecting, insert, inserts, inserted, inserting, custom, own, customised, customized, cutomising, customizing, before, html, php, direct, directive, directives, cookie, cookies, head, <head>, </head>, meta, <meta>, tag, tags, <body>, onload, on, load, style, styling, styles, attribute, attributes, within, before, area, include, includes, contain, contains, contained, pages, pages, option, select, selection, selected, level, levels, edit, prelude, preludes
